Chain Maintenance: Honda CBR1000RR-R Fireblade
🔧 Estimated time: 25-35 minutes
📅 Last updated: January 11, 2026
TL;DR
Complete chain maintenance guide for the CBR1000RR-R Fireblade. Covers cleaning, lubrication, tension adjustment, and wear inspection with model-specific tips.
🔧 Tools Required
- • Rear paddock stand (recommended)
- • 12mm wrench (axle adjusters)
- • 24mm socket (axle nut - for reference only)
- • Chain cleaning spray (O-ring safe)
- • Chain lubricant (wax or wet)
- • Soft bristle brush
- • Clean microfiber cloths
- • Ruler or caliper
📦 Parts/Materials
- • Chain lubricant
- • Chain cleaner (O-ring safe)
⚠️ Safety Warnings
- ! NEVER spin the wheel with the engine running
- ! Always work with the ignition OFF and bike in neutral
- ! Petroleum-based solvents destroy O-ring seals
- ! Keep fingers away from chain/sprocket contact points
WikiMoto Guide: Chain Maintenance
Honda CBR1000RR-R Fireblade (2020-2024)
Your Fireblade’s 525 chain is the final link between 215 horsepower and the asphalt. Neglect it, and you’re leaving performance on the table—or worse, stranded on the side of the road.
Quick Reference: CBR1000RR-R Specs
| Specification | Value |
|---|---|
| Chain Type | RK 525 GXW (X-ring) |
| Chain Size | 525 x 118 links |
| Slack (cold) | 25-35mm |
| Slack measurement point | Swingarm midpoint |
| Lubrication interval | Every 500-800 km |
| Cleaning interval | Every 1,000-1,500 km |
Maintenance Workflow
flowchart LR
    subgraph PREP["Preparation"]
        A[Rear Stand] --> B[Neutral]
        B --> C[Ignition OFF]
    end

    subgraph CHECK["1. Inspect"]
        D[Check Slack] --> E[Spin & Feel]
        E --> F[Look for Kinks]
    end

    subgraph CLEAN["2. Clean"]
        G[Spray Cleaner] --> H[Brush Links]
        H --> I[Wipe Dry]
    end

    subgraph LUBE["3. Lubricate"]
        J[Target Inside] --> K[Rotate Wheel]
        K --> L[Wipe Excess]
    end

    subgraph ADJUST["4. Adjust"]
        M[Loosen Axle] --> N[Turn Adjusters]
        N --> O[Verify Alignment]
        O --> P[Torque Axle]
    end

    PREP --> CHECK --> CLEAN --> LUBE --> ADJUST

    style A fill:#39ff14,stroke:#000,color:#000
    style P fill:#39ff14,stroke:#000,color:#000
Step 1: Preparation
Get the Bike Stable
The Fireblade’s aggressive geometry makes a rear paddock stand almost essential. If you don’t have one, the sidestand works—but you’ll need to manually rotate the rear wheel by pushing the bike forward in neutral.
💡 WikiMoto Tip: Invest in a quality rear stand. It pays for itself in convenience and prevents the awkward “push, stop, spray, push” dance.
Warm the Chain (Optional but Recommended)
A quick 5-minute ride warms the lubricant, making cleaning more effective. Don’t go crazy—you just want the chain slightly warm, not hot enough to melt your cleaning products.
Step 2: Inspection
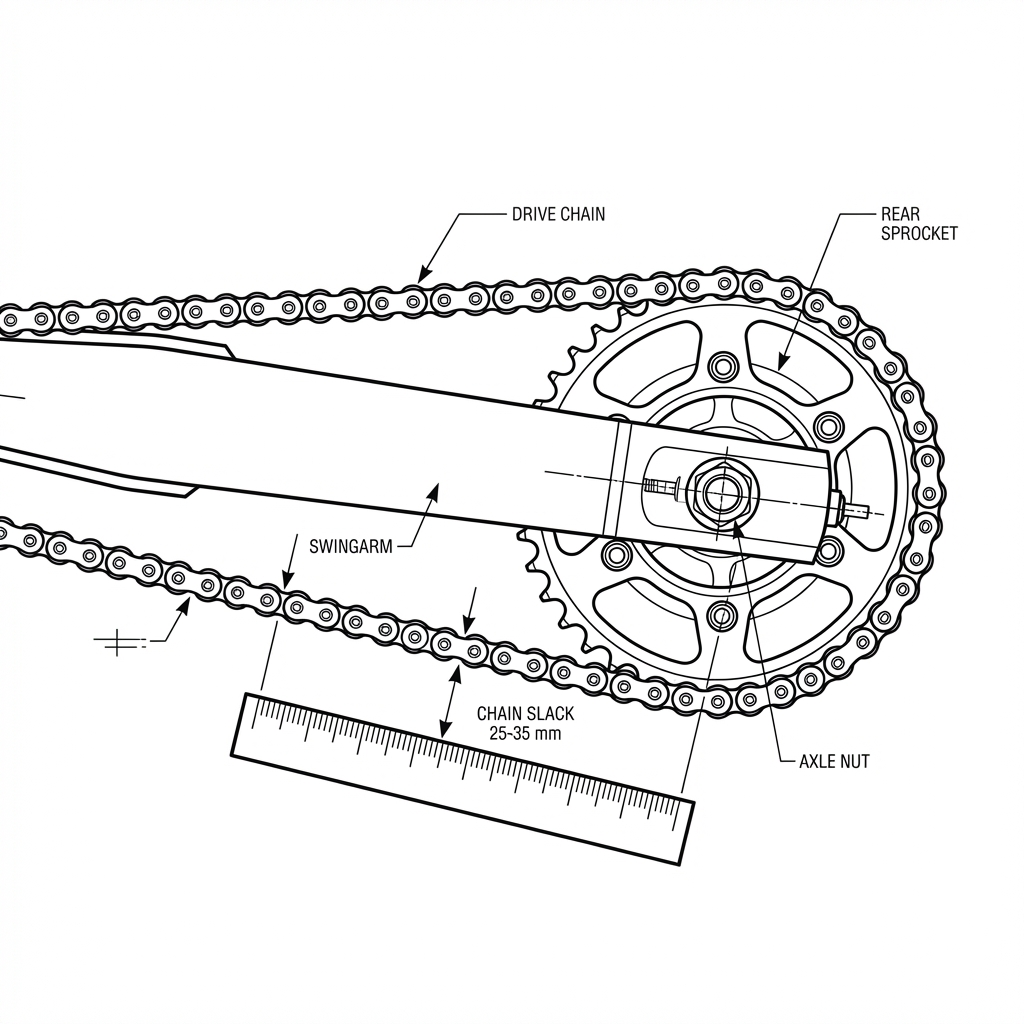
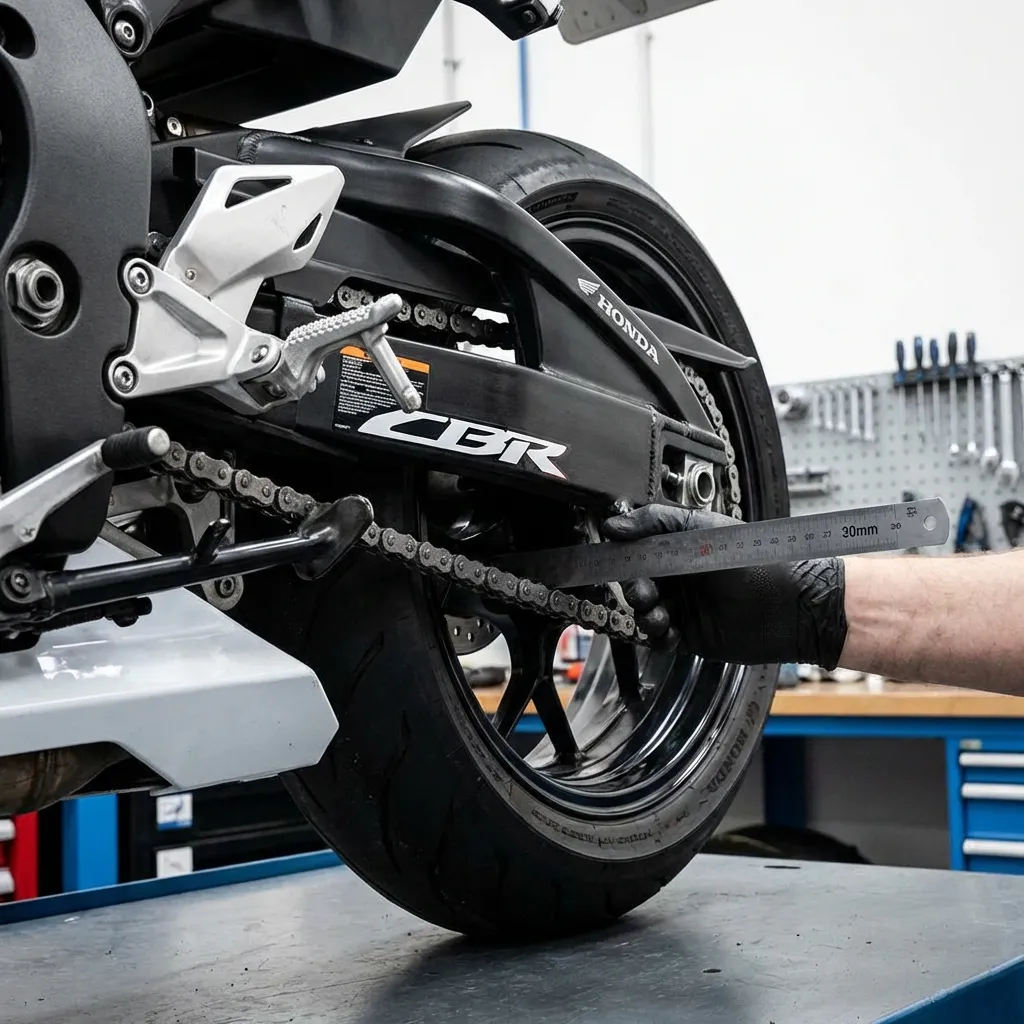
Check Slack
With the bike on the stand:
- Find the midpoint of the swingarm (between the front sprocket and rear axle)
- Push the chain up and note its position
- Push the chain down and note its position
- Measure the total vertical movement
CBR1000RR-R Target: 25-35mm of slack
flowchart TB
    subgraph MEASURE["Slack Measurement"]
        TOP["Push UP ⬆️"] --- MID["Swingarm Midpoint"]
        MID --- BOT["Push DOWN ⬇️"]
    end

    RESULT["Total Movement = 25-35mm ✓"]

    MID --> RESULT

    style RESULT fill:#39ff14,stroke:#000,color:#000
Spin and Feel
Slowly rotate the rear wheel and feel for:
- Tight spots (chain feels tighter at certain points)
- Stiff links (individual links that don’t flex smoothly)
- Grinding or clicking sounds
⚠️ Tight spots indicate uneven chain wear. If severe, replacement is imminent.
Visual Inspection
| What to Look For | Action |
|---|---|
| Rust on rollers | Clean and lube; monitor |
| Cracked O-rings | Replace chain soon |
| Kinked links | Replace chain immediately |
| Stretched beyond limit | Replace chain and sprockets |
Step 3: Cleaning
Products to Use
The CBR1000RR-R uses an X-ring chain (RK 525 GXW). X-rings are more sensitive than O-rings, so use only compatible cleaners.
Recommended:
- Motul Chain Clean
- Maxima Chain Wax Cleaner
- WD-40 Specialist Motorcycle Chain Cleaner (NOT regular WD-40)
NEVER use:
- Regular WD-40 (destroys seals)
- Gasoline
- Brake cleaner
- Industrial degreasers
Cleaning Process
- Spray the cleaner on a 6-8 link section
- Wait 30 seconds for the solvent to penetrate
- Brush gently with a soft bristle brush (old toothbrush works)
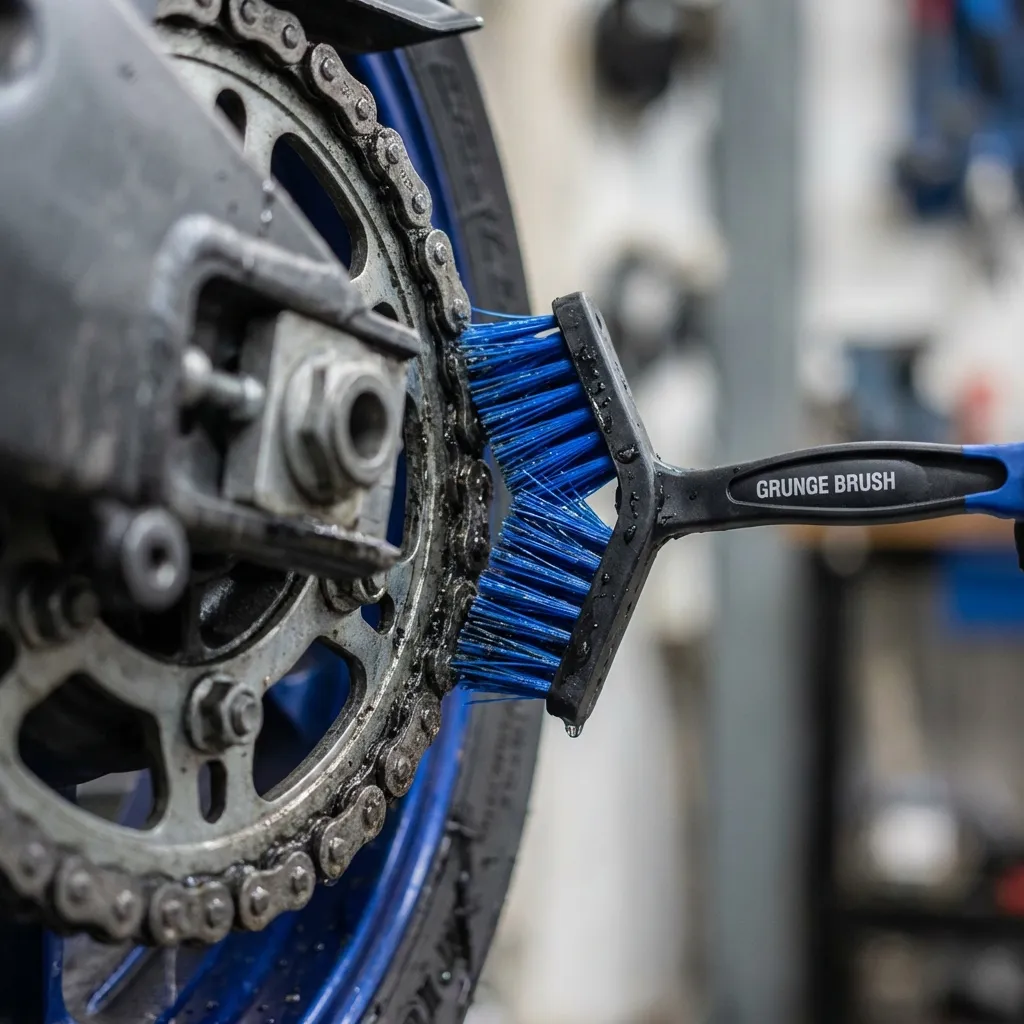 4. Wipe with a clean rag
5. Rotate the wheel and repeat for the next section
4. Wipe with a clean rag
5. Rotate the wheel and repeat for the next section
💡 WikiMoto Tip: Clean the chain from the inside (the side facing the swingarm). This is where the real grime accumulates, and it’s where the lubricant needs to go.
Step 4: Lubrication
When to Lubricate
- After every cleaning
- Every 500-800 km in normal conditions
- Immediately after riding in rain
- Before extended storage
Application Technique
The goal is to get lubricant inside the rollers, not just on the outside.
- Target the inside of the chain (between the plates and rollers)
 2. Spray while rotating the wheel slowly
3. One full rotation is usually sufficient
4. Wait 5 minutes for the lubricant to penetrate
5. Wipe off excess from the outer surface
2. Spray while rotating the wheel slowly
3. One full rotation is usually sufficient
4. Wait 5 minutes for the lubricant to penetrate
5. Wipe off excess from the outer surface
flowchart LR
    A["Spray Inside Edge"] --> B["Rotate Wheel Slowly"]
    B --> C["Wait 5 min"]
    C --> D["Wipe Excess"]

    style A fill:#3b82f6,stroke:#000,color:#fff
    style D fill:#39ff14,stroke:#000,color:#000
💡 Pro Tip: Lube after riding, not before. A warm chain absorbs lubricant better, and you avoid flinging fresh lube all over your wheel.
Step 5: Tension Adjustment
When to Adjust
Only adjust if slack is outside the 25-35mm range. Over-tightening is worse than being slightly loose—it accelerates wear on the chain, sprockets, and output shaft bearing.
CBR1000RR-R Adjustment Procedure
Tools needed: 12mm wrench (adjusters), 24mm socket (axle nut)
- Loosen the axle nut (left side) - do NOT remove, just loosen enough to move the axle
- Locate the adjusters on both sides of the swingarm
- Turn both adjusters equally - clockwise to tighten chain, counterclockwise to loosen
- Check alignment marks on both sides - they must match!
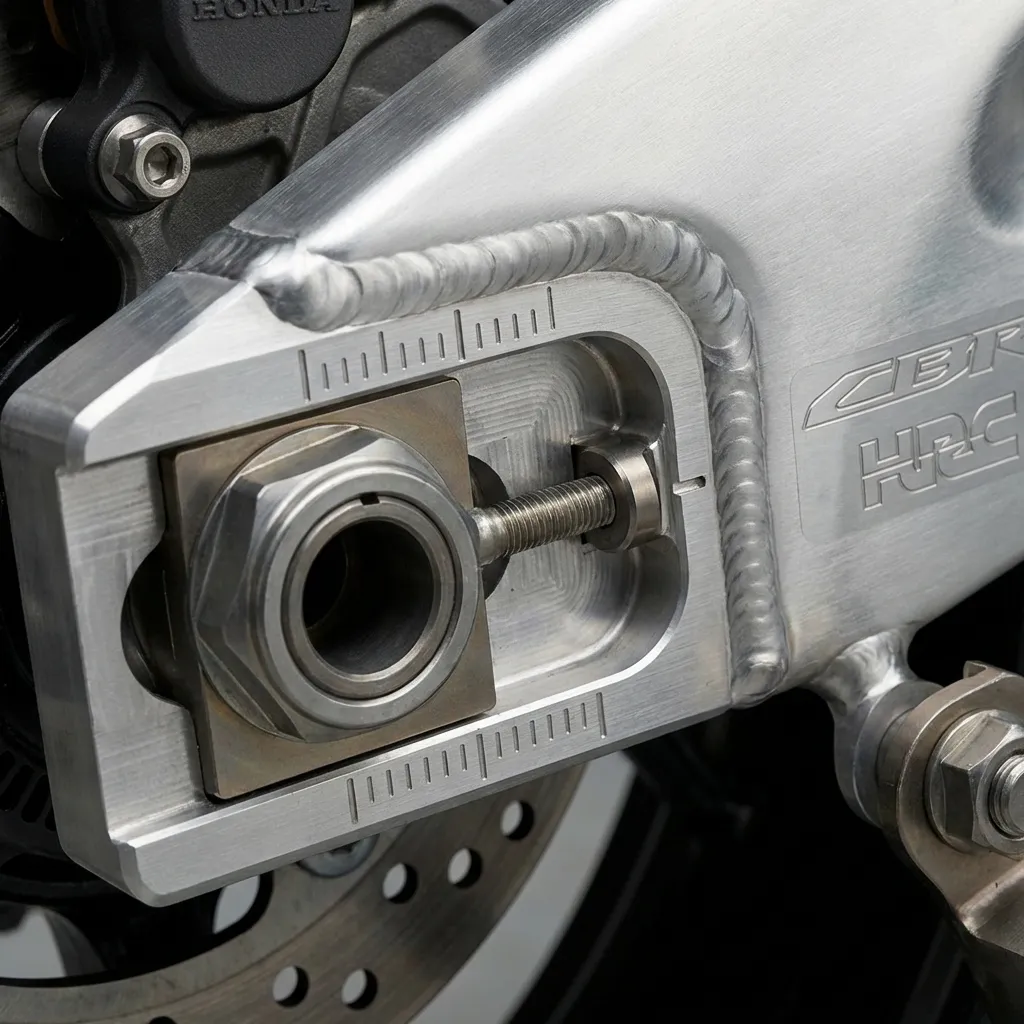 5. Re-check slack at the midpoint
6. Torque the axle nut to 113 Nm (83 lb-ft)
5. Re-check slack at the midpoint
6. Torque the axle nut to 113 Nm (83 lb-ft)
flowchart TB
    subgraph ADJUST["Adjustment Process"]
        A[Loosen Axle Nut] --> B[Turn Left Adjuster]
        B --> C[Turn Right Adjuster]
        C --> D[Verify Alignment Marks Match]
        D --> E[Check Slack 25-35mm]
        E --> F[Torque Axle 113 Nm]
    end

    style D fill:#ff4444,stroke:#000,color:#fff
    style F fill:#39ff14,stroke:#000,color:#000
⚠️ Critical: If the alignment marks don’t match, your rear wheel is crooked. This causes uneven tire wear and dangerous handling.
Wear Inspection: When to Replace
The 3% Rule
A chain stretched beyond 3% of its original length must be replaced. On a 525 x 118 chain:
- Original length (12 pins): ~363mm
- 3% stretch limit: +11mm = 374mm total
Quick Check Method
- Grab the chain at the rear of the rear sprocket
- Try to pull it away from the sprocket teeth
- If you can see more than half the tooth, the chain is worn
| Condition | Action |
|---|---|
| Chain pulls slightly away | Monitor closely |
| Half tooth visible | Plan replacement |
| Full tooth visible | Replace immediately |
💡 Always replace sprockets with the chain. A new chain on worn sprockets will wear prematurely.
Parts & Tools (Affiliate Links)
Recommended Chain Lubricants
- Motul Chain Lube Factory Line - Our top pick for sport bikes
- Maxima Chain Wax - Clean, long-lasting protection
- DID Chain Lube - OEM-approved option
Recommended Cleaners
- Motul Chain Clean - Safe for X-ring chains
- WD-40 Specialist Motorcycle - Budget-friendly option
Replacement Chain (when needed)
- RK 525 GXW (OEM spec) - Gold X-ring, 118 links
- DID 525 VX3 - Excellent aftermarket alternative
- EK 525 ZVX3 - Premium option for track use
Maintenance Log Template
| Date | Mileage | Task | Notes |
|---|---|---|---|
| Clean + Lube | |||
| Slack Adjusted to: ___mm | |||
| Chain Replaced | New chain brand: |
WikiMoto Verdict: Chain maintenance on the CBR1000RR-R is straightforward beginner-level work that has outsized impact on performance and safety. The 25 minutes you spend every 1,000 km will save you from a $400+ chain/sprocket replacement and keep that 215 HP connected to the ground where it belongs.